Tools That Will Help You Grow Your Twitter Faster
Hello, Folks welcome to the last chapter of twitter marketing. In this chapter, we will talk about using Canva to create twitter images.
Twitter posts get more engagement when people see high-quality photos or images in tweets. As more people see the tweet, they can retweet it since it catches their attention.
Your tweets can have high-quality photos with custom text using a free web app called Canva.
A great Twitter strategy requires in-depth Twitter analytics to understand what’s working and what isn’t.
Before we create images using Canva, let’s talk about the recommended image size that we must use for twitter images. You must create photos with a minimum of 600x 335 pixels.
But creating 1200 pixels wide by 675 pixels in height is best shown on desktop tweets and mobile tweets. For profile photos, the recommended size is 400 x 400 pixels.
If you have a business logo that is in a square image, make sure that the corners won’t get cut off as it is uploaded. Since profile photos on twitter are shown inside a circle.
For cover photos, the recommended size is 1500 x 1500 pixels.
Canva is a browser-based design tool that makes it easy for non-designers to create great images. There’s also a handy mobile app!
Benefits of Canva:
→ Pre-sized social media templates.
→ Designer type templates get your graphics started.
→ Lots of size and shape options.
→ Search for stock images and pay a small fee to use – or use the free stuff.
→ Save your images to edit or download later.
→ Easy to make multiple, similar graphics from a template.
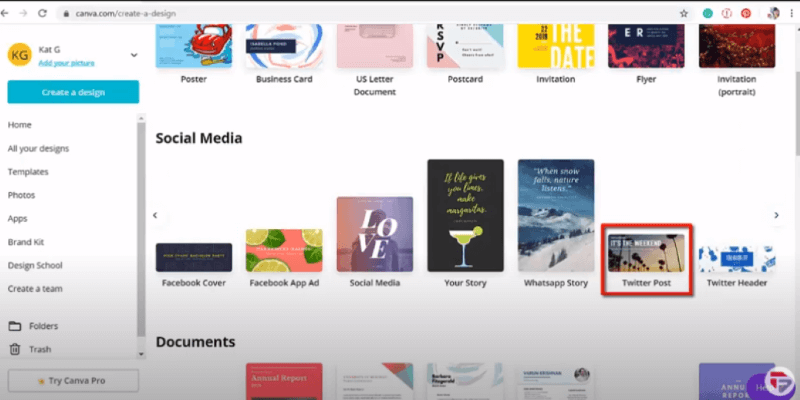
Now let’s use Canva to create Twitter images:
- Go to Canva.com
- Log into Canva ( If it’s your first time, you’ll have to set up an account).
- Click the ‘create a design’ button in the top right corner.

- You can pick from ‘custom dimensions’ or a range of pre-selected sizes.
- Canva makes it easy to start your design by including templates for the optimal sizes on many social media platforms.
- Under Social Media, click Twitter post
You can also select things like a Pinterest image, an Instagram post, a Facebook post, or more.
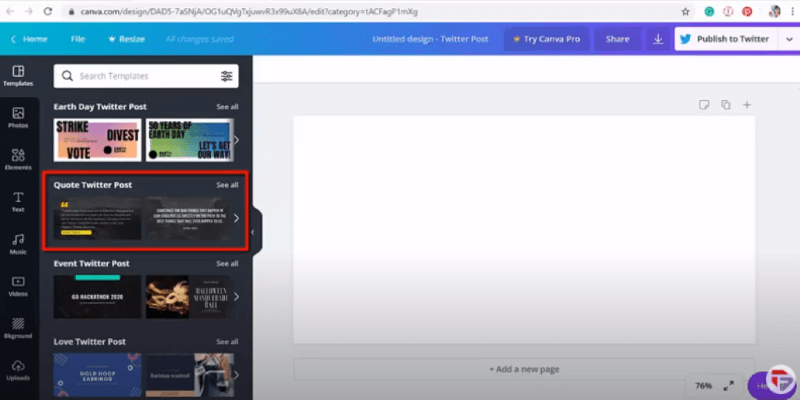
- Click the left menu, you can see the available templates.
- Select from the different options available
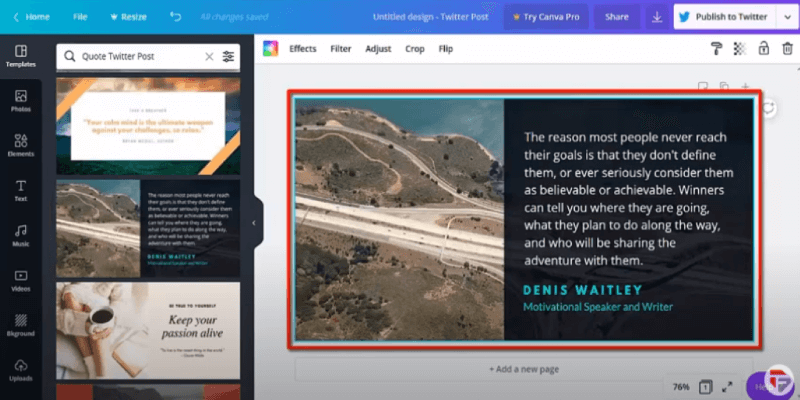
- Earth day twitter post
- Quote twitter post
- Event twitter post
- Love twitter post
- Announcement twitter post (and many more)
- Think about which template best suits your quote. In our case, we want to pair our message with city life, so a side-by-side template will work best. It will give the photo and message equal emphasis.
Now that we have a template we like, we'll make a few changes to customize it. Let’s start by changing the message. Just select it and begin typing your quote. Below it, we’ll add the author’s name.
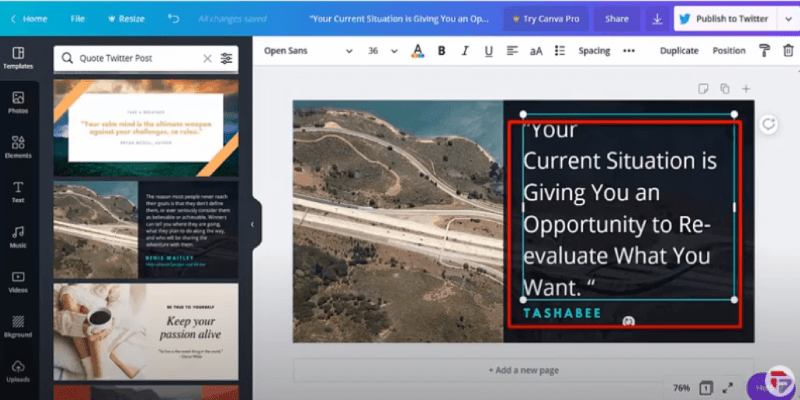
Depending on how much text you have, you may want to change the font size. Since this is a short quote, we can increase the font size a bit. We’ll just click the text box and go up to the menu bar to change it.
Although you can use the mouse to click and drag the text box, we suggest using the arrow keys. It's more precise, and it allows you to keep the horizontal centering the same.
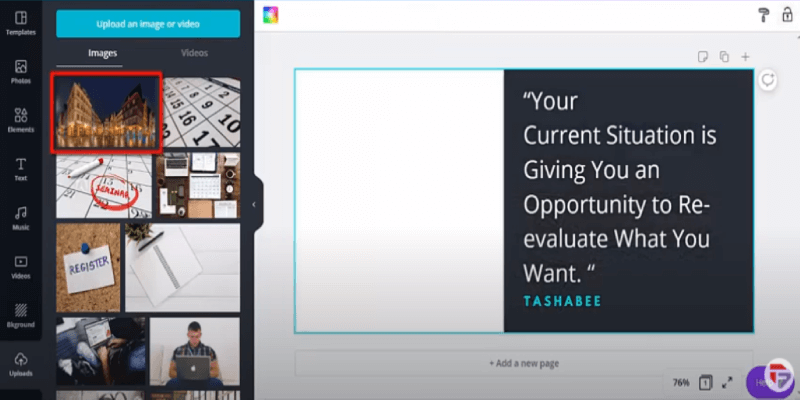
Now that we have our message, let’s pair it with a photo that tells the quote’s story. You have some options for photos:
Upload your photo: Click Uploads to import a file from your computer or a site like unsplash.com. Canva will store the photos here for future use.
Select a Canva stock image: Click Photos and type one or more keywords into the search bar to find free and paid photos.
First, we’ll remove the current photo by selecting it and then clicking the trash icon at the top of the page.
- Choose the photo from the uploaded image
- Edit this photo, click position then click back
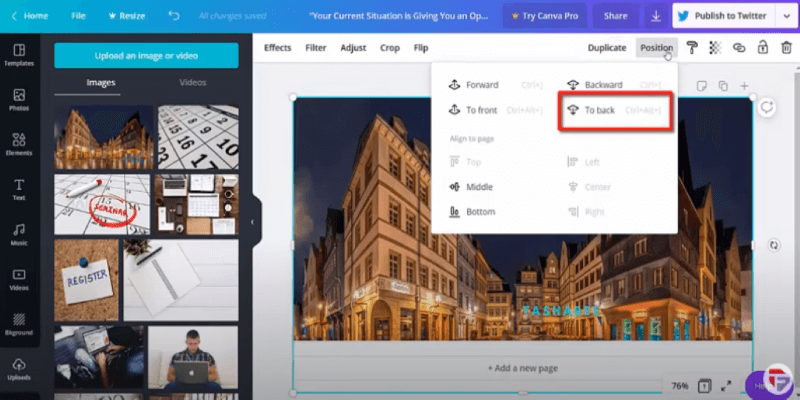
- The image will be shown at the back of the quote
- You can select photos from other apps as well

- You can select from Pixabay (stock of images)
- Here’s our created image
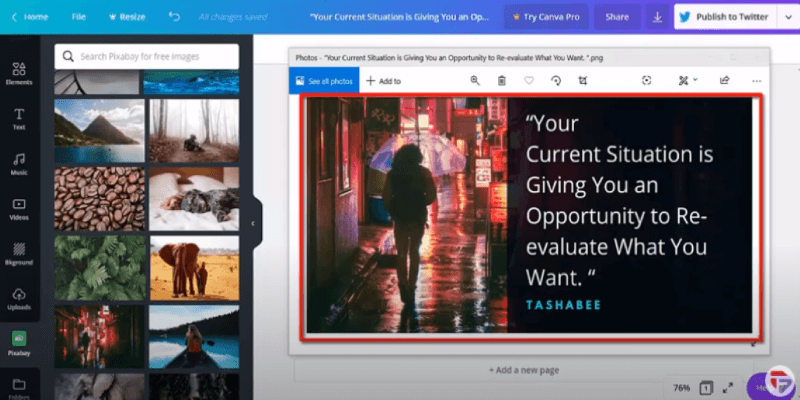
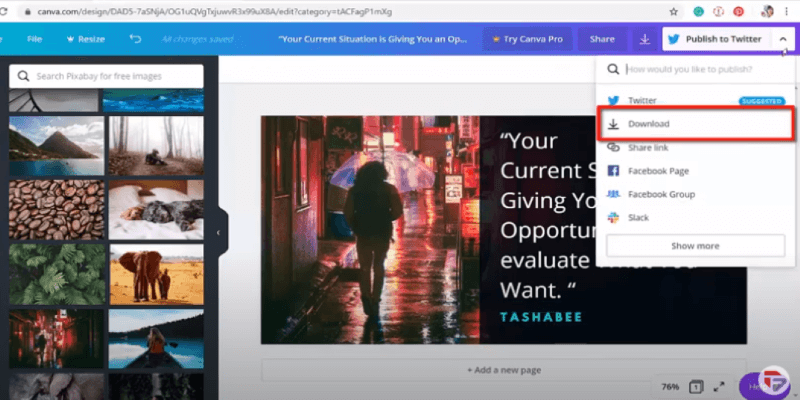
When you’re happy with your design, you can publish directly to Twitter or download your images. We suggest downloading the images because it gives you more flexibility to choose when to post each image.
So we'll click Download, and then we can upload it to Twitter later.
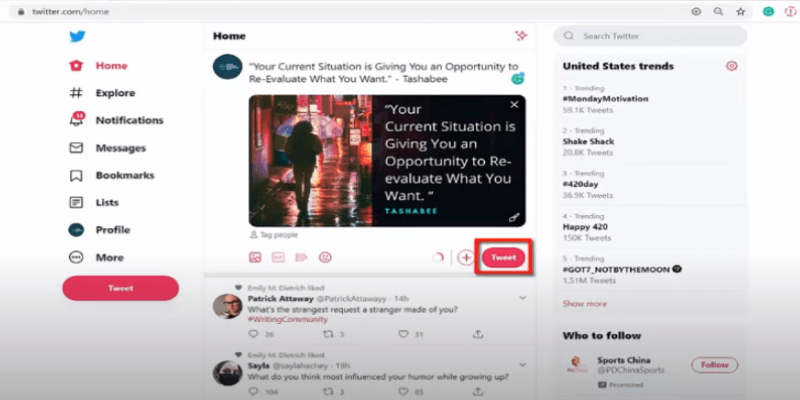
Now let’s upload it on Twitter. Click the tweet button.
Regularly posting a variety of content will pay off as it helps you to build your customer base over time.
Let’s create a Twitter logo
- Go to canva.com
- Choose custom dimensions
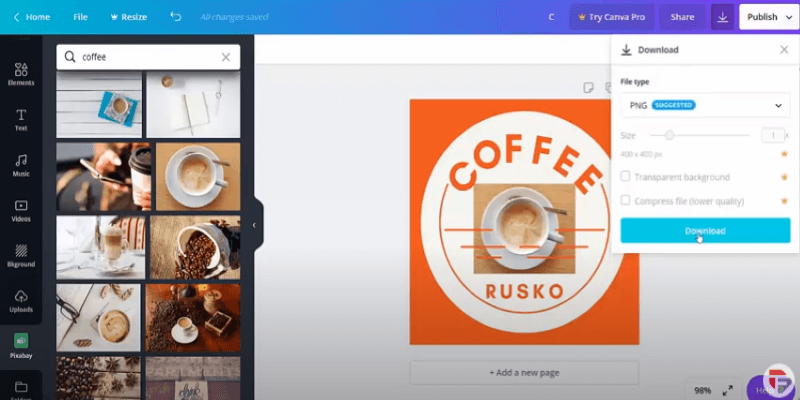
- Import the recommended width and height for the twitter profile photo
- 400 x 400 px for logo
- Click create a new design

- You can choose from the templates.
- Once selected, download the image
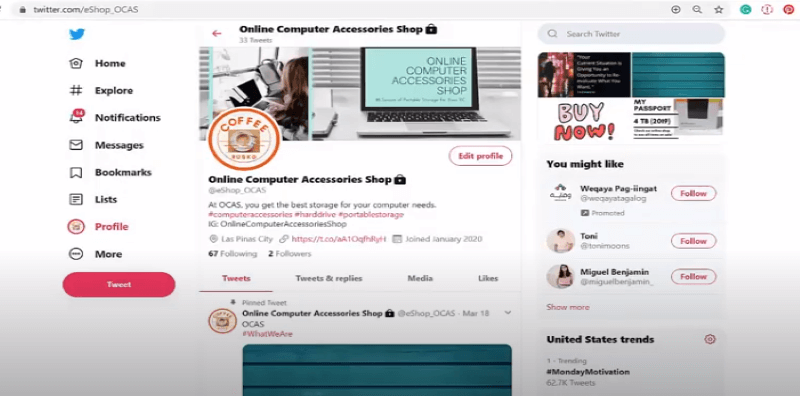
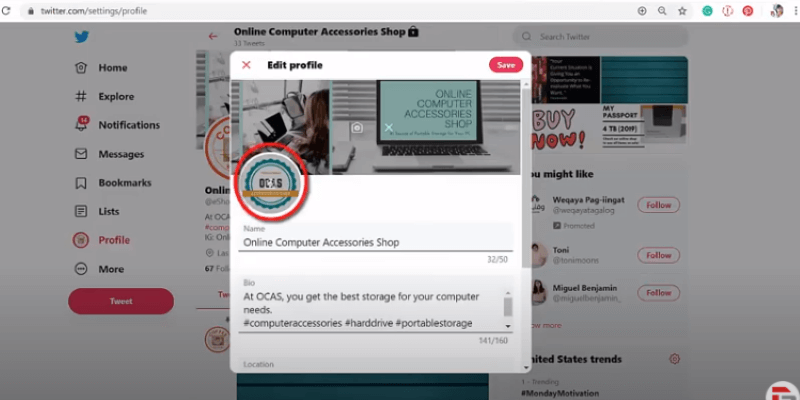
- Go to your Twitter profile
- Click edit profile
- Use this photo
- Click save
- You have successfully changed your profile photo
You can also search for a logo in the search box. Tons of logos are available to choose from. Let’s create another logo,
- Choose from logo
- Edit the text and color
- Download it once you are done editing
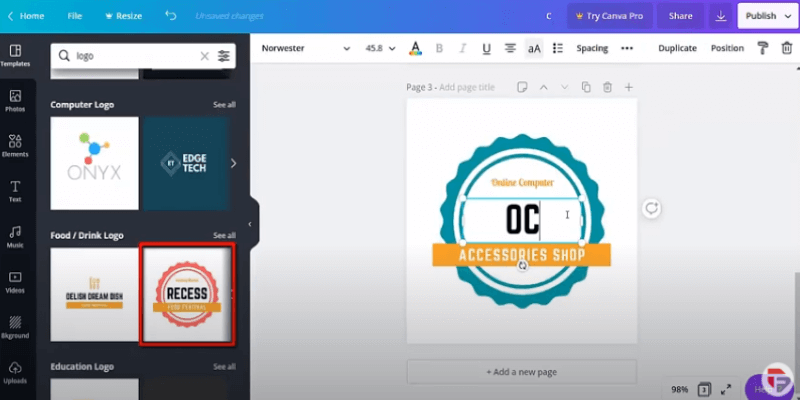
- You can now upload it on Twitter
- Before you save it check if the logo is not cut off inside the circle.
- Click save
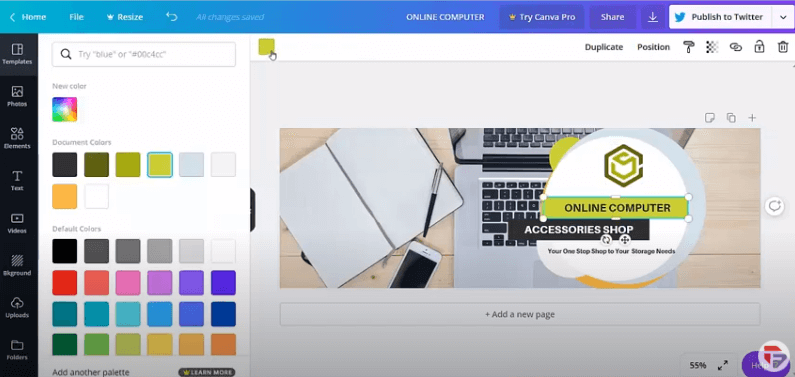
Let’s create a Twitter Header
- Go to canva.com
- Under social media, look for twitter header
- You can choose from hundreds of professionally designed layouts
- Once selected, you can edit the header
- Change the text and color
- Once done, click download
- Upload it on twitter
- Now here is the twitter header that we have created.

Conclusion
Using Canva to Create Twitter Images will be easier for you to create a good design for your tweets. You have tons of templates that you can choose from.
You don’t have to make your image from scratch. You can browse from a list of available categories of templates, change the image from that template and edit the text.
You don’t have to know what dimensions of images you must use. It already has predefined custom dimensions for every social media platform like twitter.
Hope this lesson was useful, we will now proceed to the next chapter.
Embedding your tweets on your blog using Tweet Line
Twitter has tons of users who can be your potential audiences and customers. There are times when people are using search engines like google to look for articles or blogs of topics where they can learn something from.
If they stumble upon your blog where you are giving free information on the benefits of using one of your products. Then you must take advantage of these website visitors for them to see your tweets.
If they liked your blog, the tweets they see on your blog will make them decide to go to your twitter profile. This way they can add to your followers, get updated with your business’s latest updates and product promotions.
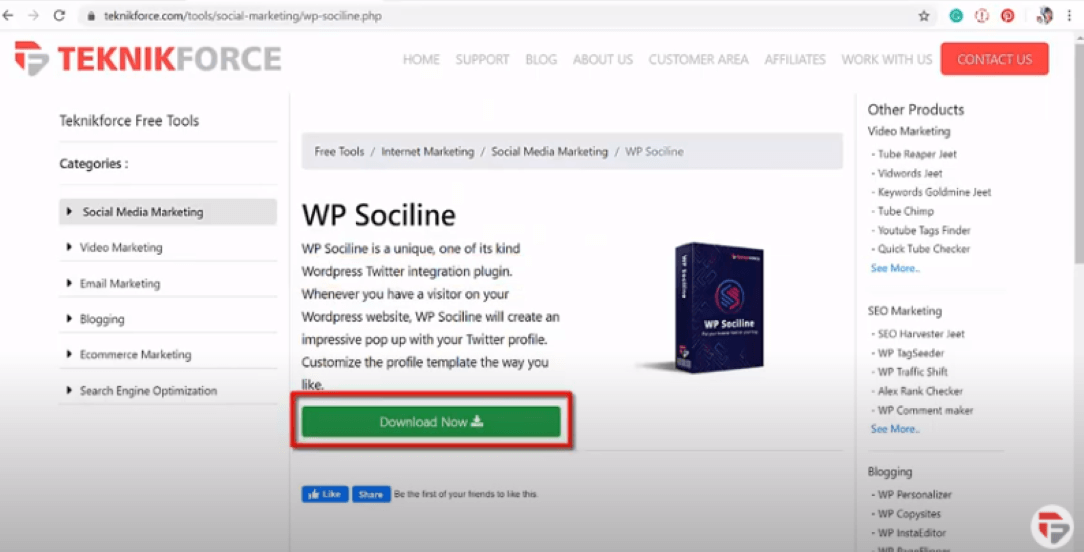
TweetLine is a plugin that will allow your tweets to be viewed by your website visitors without going to Twitter.com and searching for your Twitter handle to view your tweets.
To use TweetLine you must have a WordPress website. TweetLine is also a WordPress twitter integration plugin.
You can download it for free from the Teknikforce website i.e,teknikforce.com
Once downloaded upload it on your WordPress site.
- Log in to your WordPress Dashboard
- Click on “Plugins” in the menu on the left-hand side
- Click “Add New” at the top of the page
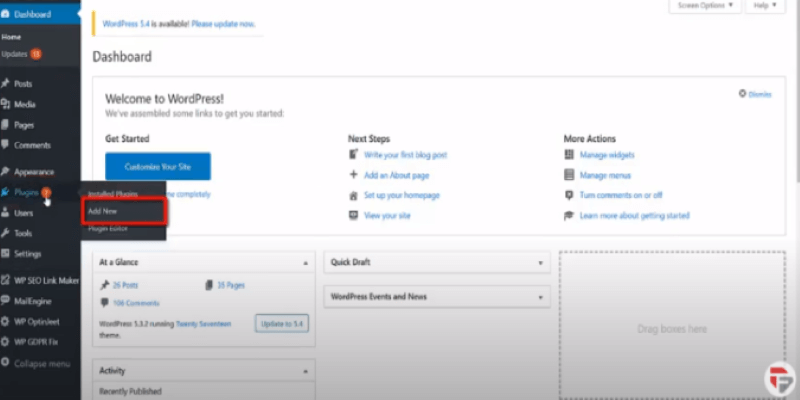
- Click on the upload plugin button
- Click choose a file to upload plugin
- Tap Install now

- After installing, you’ll be shown two links. One says Activate Plugin, the other says Return to Plugin Installer. Click on “Activate Plugin.”
- Once you have activated the plugin you can see the plugin at the front end of your site.
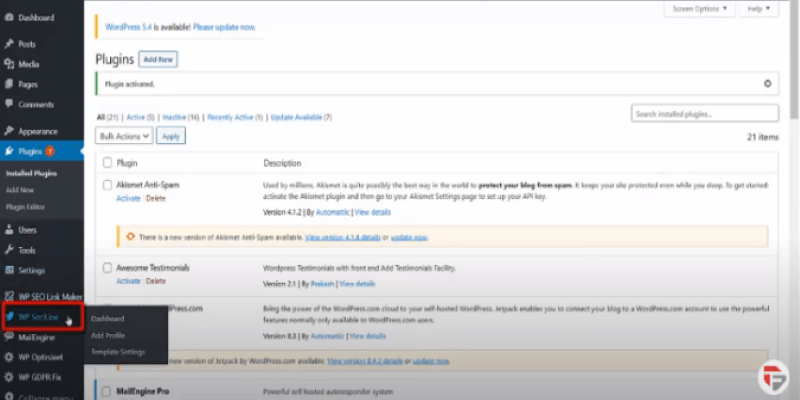
WP SociLine is the old name of TweetLine. This plugin is very easy to use.
- Add Twitter handle for your business
- Click save

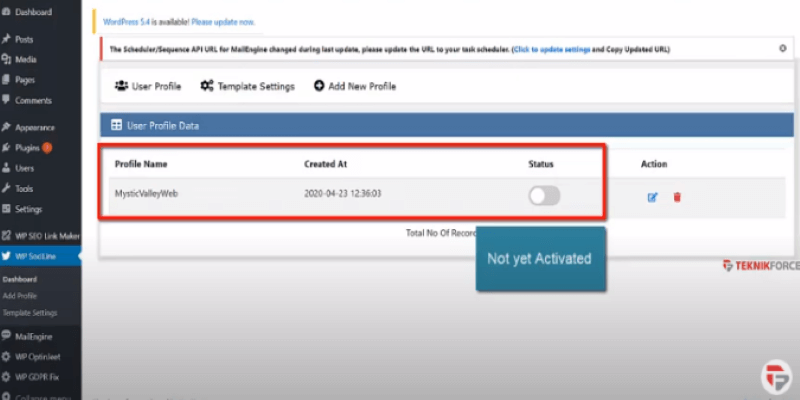
- Go to user profile
- By default, this twitter handle is not active
- Activate it
Now let’s take a look at the blog. You can see the tweetline button in the corner of the page as a twitter icon.
When you click on it, you will see a pop-up window. People who visit your blog will be able to view all your Tweets.
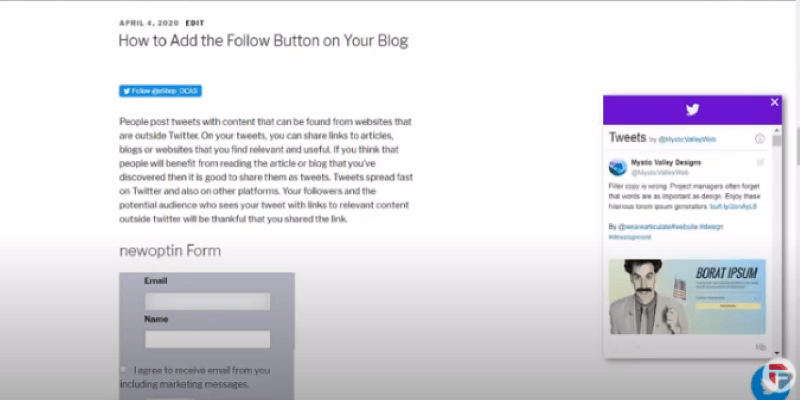
You can use multiple Twitter handles on TweetLine. Just make sure to activate the one with maximum Tweets. People on your blog can easily like your tweets and can even follow you on Twitter.
Conclusion
Embedding your tweets on your blog will give you more audience reach by using your website. Your website visitors can see your live twitter feed without leaving your blog.
As they get curious about your tweets inside your blog, people can be directed to your twitter profile using TweetLine. Your website visitors can be converted to your followers.
Hope this lesson was useful. We will now proceed to the next topic.
Using TweetDeck for Managing Multiple Twitter Accounts
Twitter handles must be managed by its owner to engage and monitor tweets and mentions from different twitter handles who could be their potential followers or audiences.
If your business uses multiple accounts on Twitter, it will need to be monitored closely. Without the help of twitter tools, your multiple twitter handles will be accessed from multiple multiple browsers.
Or using a single browser and logging out from each handle to access the other Twitter profiles for your business.
TweetDeck will help you manage and monitor tweets, messages, mentions, or engagement on each of your multiple Twitter handles by using one dashboard.
To use TweetDeck, you can go to TweetDeck.twitter.com and log in with your Twitter account. If you’ve already logged in with one of your business handles this is how your dashboard will look like
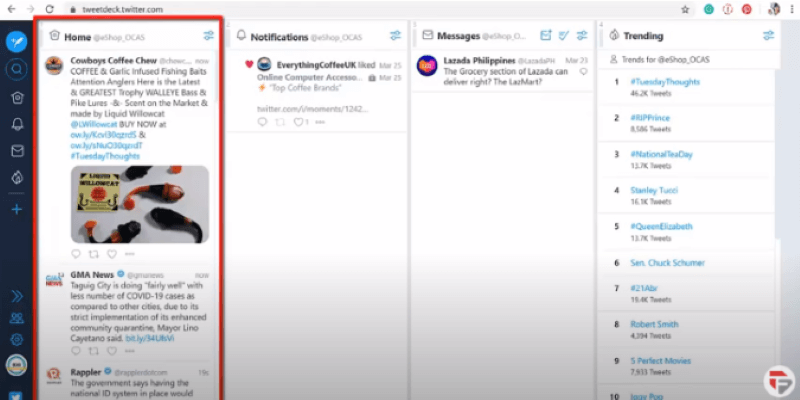
You will see multiple columns with:
- Home Feed
- Notification
- Messages
- Trending Columns
How to connect multiple Twitter accounts in your TweetDeck
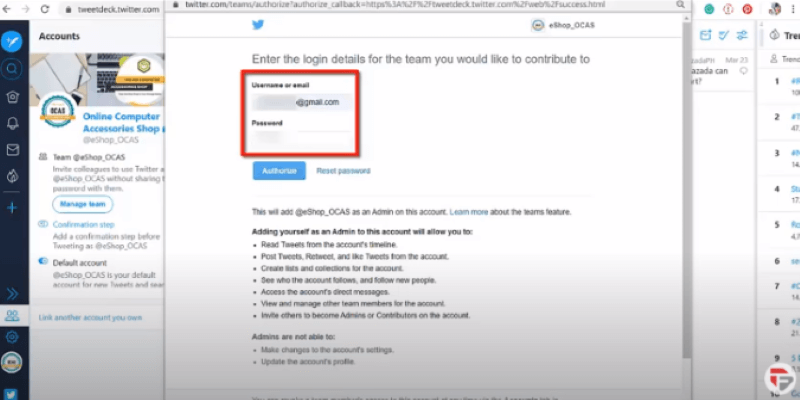
- Click Accounts in the navigation bar.
- Click on Link to another account you own.
- Read the message to understand that adding yourself as an admin will allow you to do some important tasks, then click continue.
- In the new window, enter the username or email and password of the account and click Authorize.
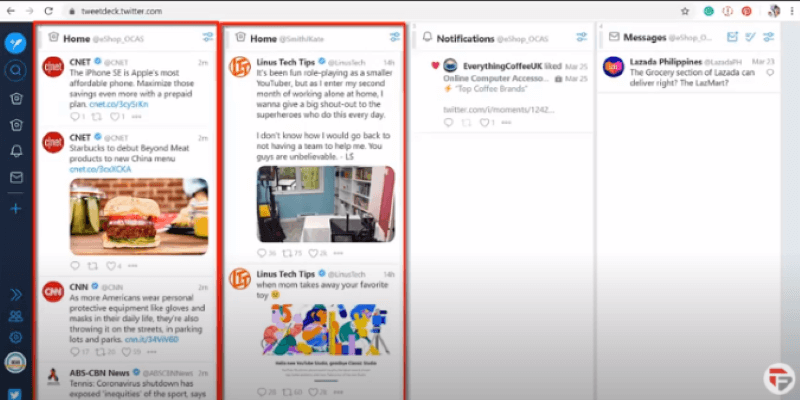
Now let’s add columns for the new account.
- From the navigation bar, click on the plus icon to select the Add column.
- Choose column type to add
- Home
- User
- Notification
- Search
- List
- Your accounts, select the account you wish to populate the column.
- The added column will be seen on the right side
- You can easily drag it close to your other home feed. It will be easier to view the home feed streams of multiple accounts.
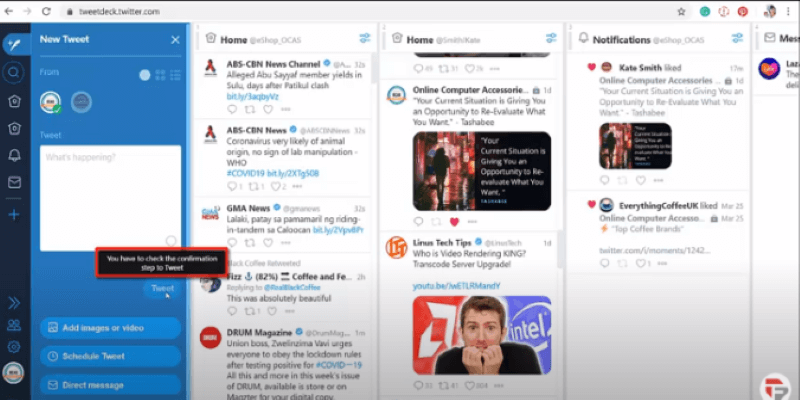
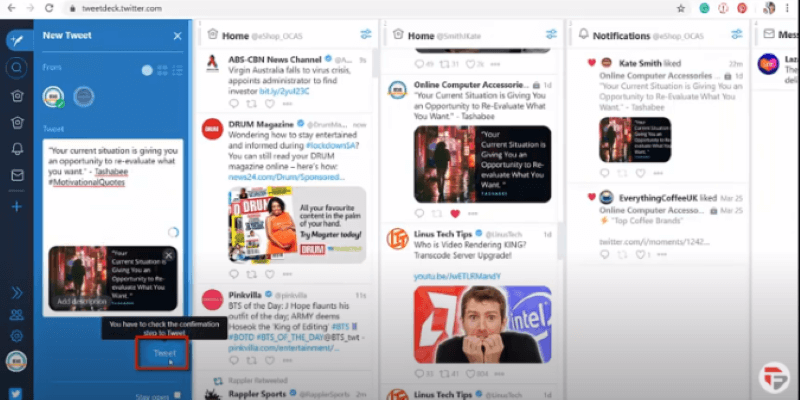
How to connect multiple Twitter accounts in your TweetDeck
Activate the 'Confirmation step' toggle. Once you do that, every time you tweet from the TweetDeck, the post won't go live till you check the 'Ready to Tweet' option.
The Tweet Composer in TweetDeck makes it easy to join the conversation, whether you want to share what’s happening with words, images, GIFs, Emojis, Threads, Polls, and more.
→ Click Tweet while logged into your Twitter account.
→ If you’re logged into multiple accounts, confirm the Twitter account you’d like to Tweet from is selected.
→ Compose your Tweet with text. Add an emoji by clicking on. Include an image or video by selecting, add a GIF by tapping, or add a poll with.
→ To create a thread, click on to add the next Tweet in your thread.
→ Click Tweet to share.
To create a filter
→ Click the filter icon in the column header, next to the column title.
→ Select which types of filter(s) (Content, Users, or Alerts) you would like applied to the column.
→ Click the filter icon again to collapse the column settings.
→ Note: Columns with custom filtering will display Filtered by along with the icon for the filter you have enabled.
To remove a column:
→ Click the filter icon in the column header, next to the column title.
→ Click the Remove button to delete a column.
Conclusion
Using TweetDeck can help your business in monitoring multiple twitter accounts and engage in real-time. You can view multiple accounts in one interface.
You can even schedule your tweets using TweetDeck. You can customize how you want to view your different streams by adding columns.
The advanced features of TweetDeck will help you save time in monitoring every aspect of your business’s multiple twitter handles.
Hope this topic is useful. We will now proceed to the next Topic.
Twitter Automation using TweetPush
Engaging with potential customers and audiences will take much of your time in finding the tweets from these people in your niche.
→ Finding leads
→ Monitoring mentions on your twitter handle
→ Finding new people and connecting automatically
→ Spotting local trends
Finding people who are talking about relevant topics in certain locations are the features of TweetPush that your business can benefit from.
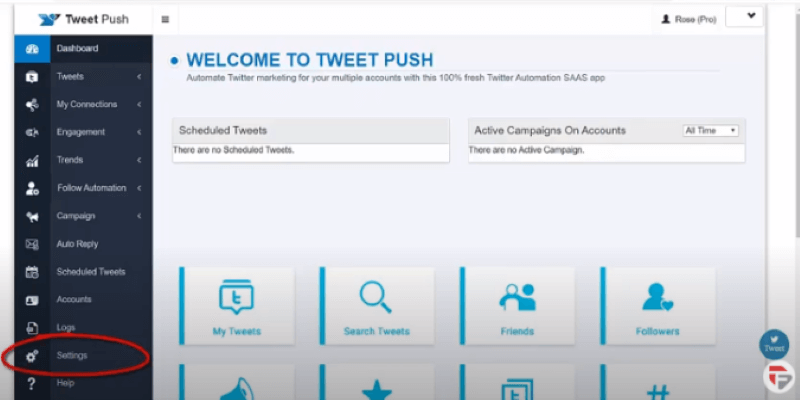
- Log in to your TweetPush Profile
- If it is your first time, go to settings
- Fill in the details here such as email address and password
- Your TimeZone
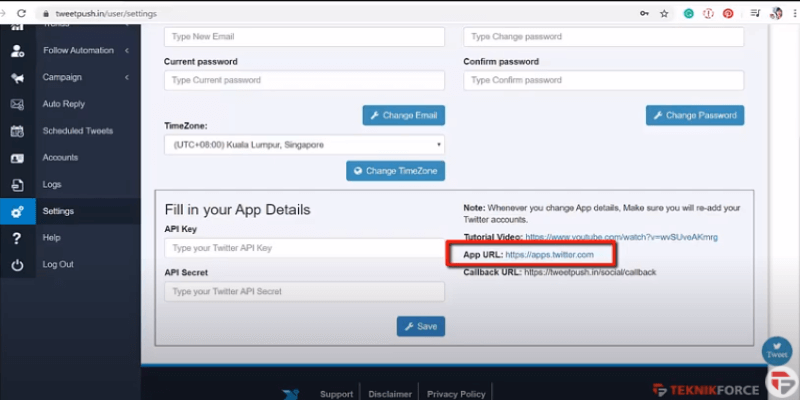
- Fill the API key and API secret key to do that we must first connect the TweetPush app to your twitter profile.
- Go to the App URL
- Click create an app
- Choose from these options for your primary reason for using Twitter Developer App
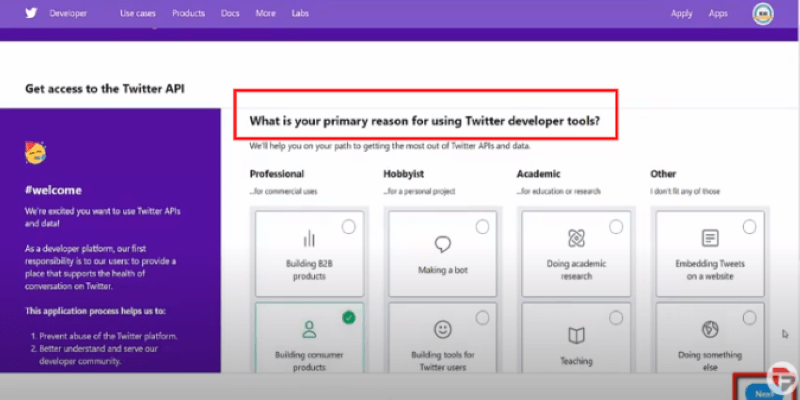
- You have to click on all the submit buttons and then in the end apply.
- In the end, you have to verify your email address and then you are good to go.

- Go back to the APP URL
- Click the create an app button
- Put the App Name, Description, and Website URL.
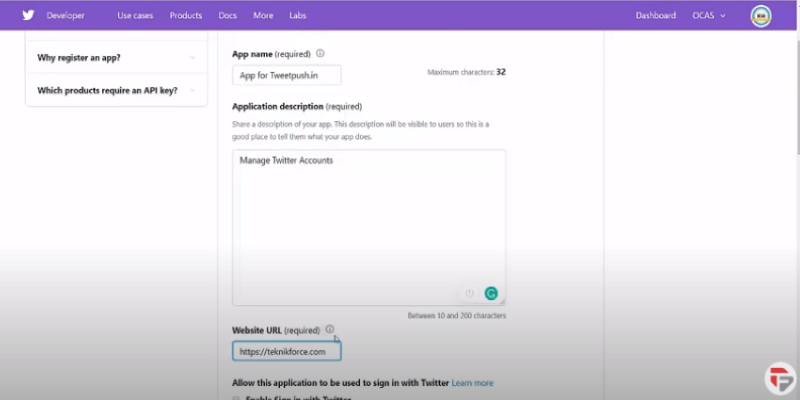
- In the callback URL put App Url (Copy it from TweetPush settings)
- Click the create button
- Congratulations you have successfully created an app
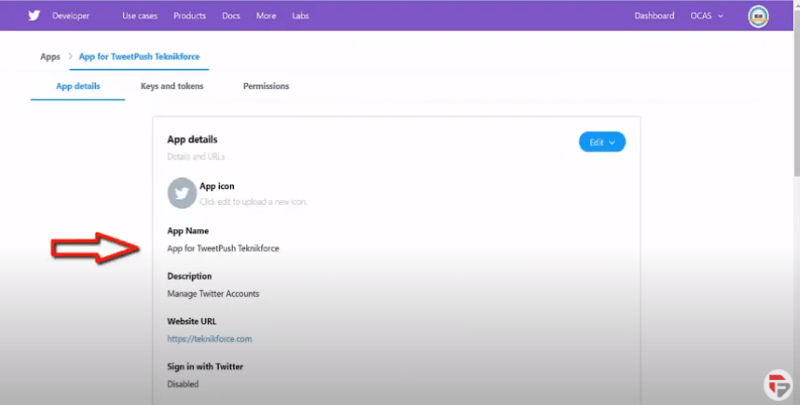
*Now go to the keys and token area you will find the API key and API secret key. Paste the keys in the Fill in your App Details*
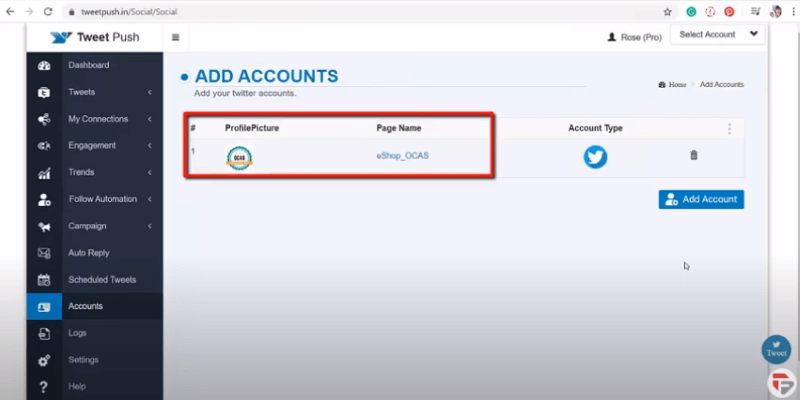
Add Account to Tweet Push
- Go to Accounts
- Click Add accounts
- Authorize App Tweet Push to access your account
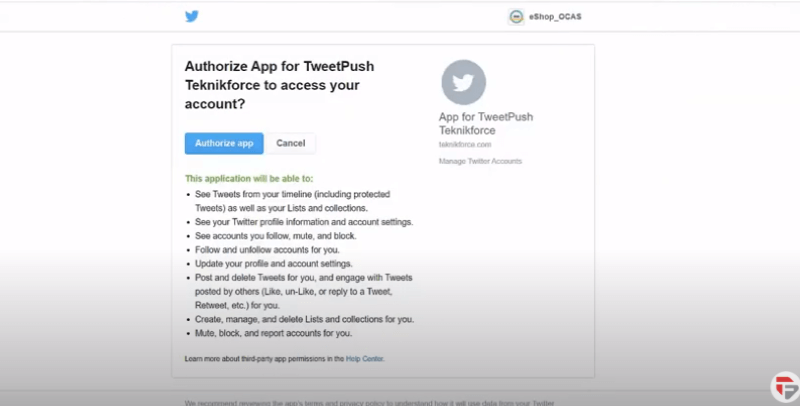
- Click the Authorize app button
- In this section, click add account
- If you have scheduled tweets you can view them here
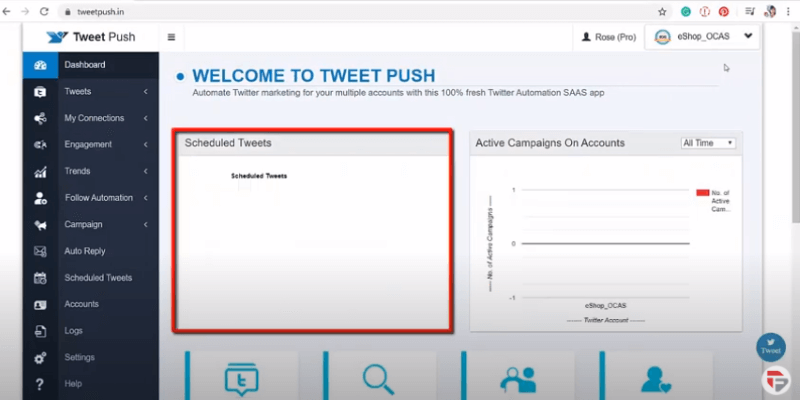
- These are the links to frequent tasks done on Twitter

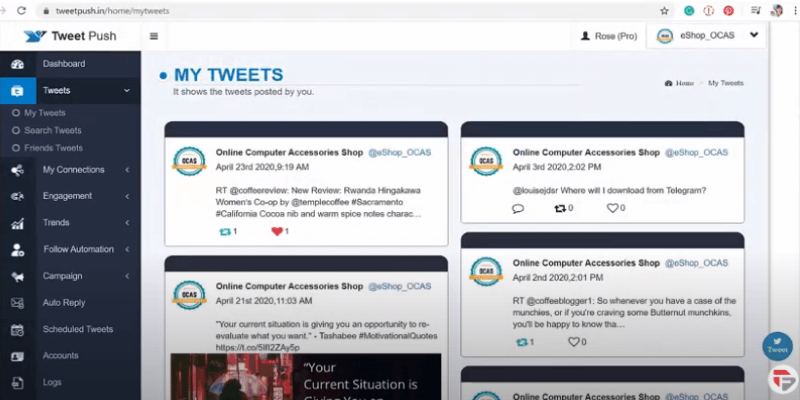
- Click My Tweets, you can see the tweets that you have posted
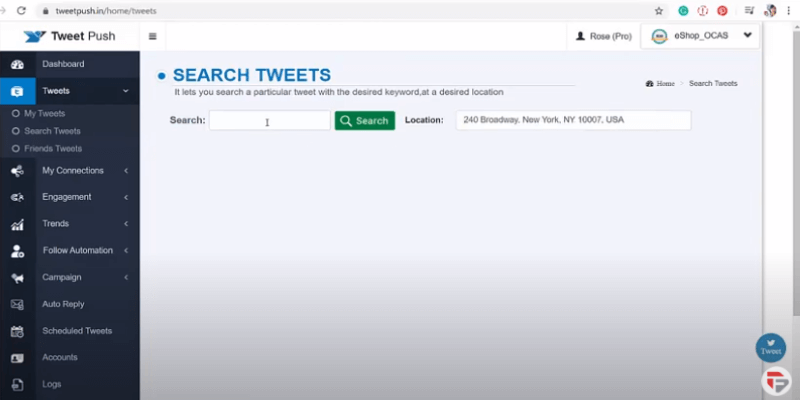
- You can even search for tweets that are posted by users from specific locations.
- You can like and even retweet the tweets you like
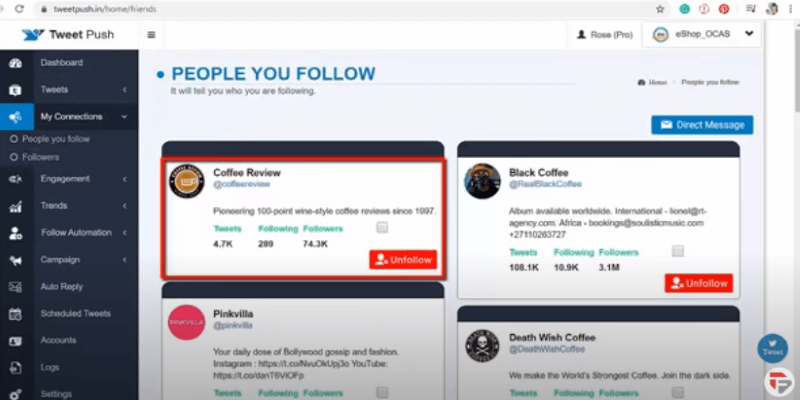
My connections
You will see the people you follow, you can send direct messages to them by clicking the checkbox.
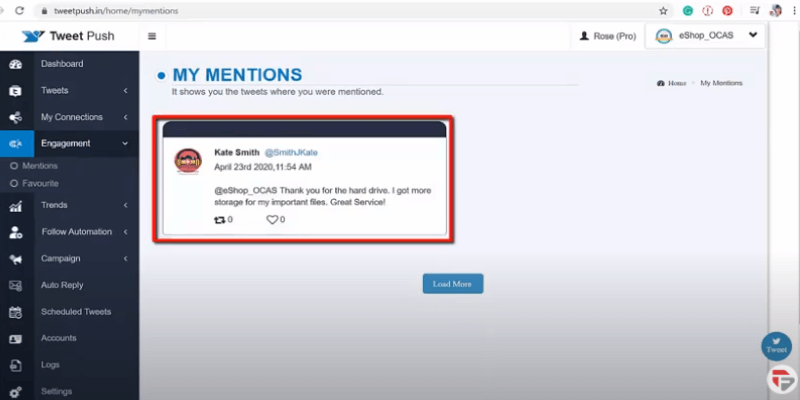
Engagements
When you click on engagements you can see the number of times a user interacted with a Tweet.
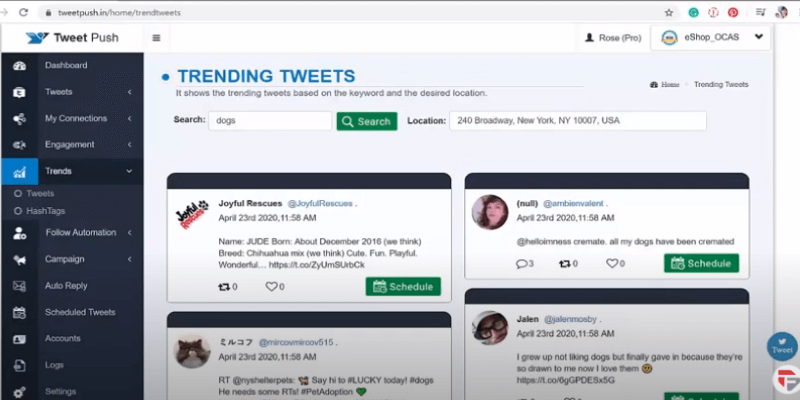
Trends
You can click on trends to look for trending tweets in a particular area. Can even search for trending hashtags.
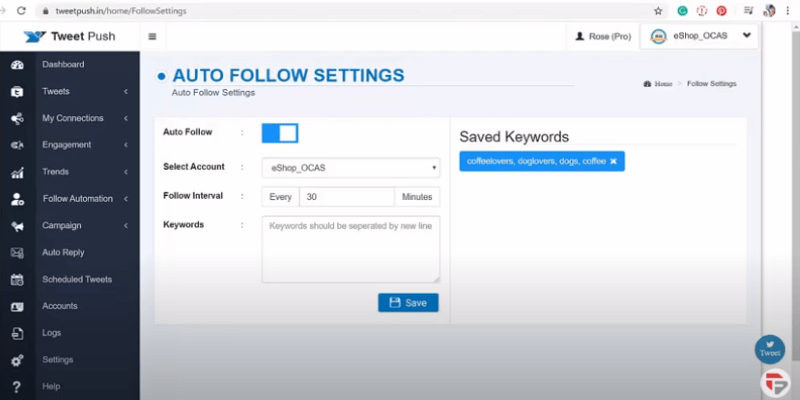
Follow Automation
Follow automation saves your time as it automatically follows people who have put the same keywords mentioned by you in the Keywords box.
- Click Follow settings
- Put follow interval
- Click auto-follow
- Enter keywords (When people include these keywords in their post TweetPush will automatically follow them )
- Click save
Conclusion
TweetPush allows you to autoreply, monitor trends, engage with people in your niche, create new connections, and schedule tweets.
Twitter is a great platform where you can find your potential audience in your niche.
Using TweetPush will help your business save time in sending messages, follow people, monitor tweets to reply to and it can do these for you automatically as you set it.
After completely going through this course, you surely will become Twitter Marketing Hero! Good Luck!