How To Automate WhatsApp Marketing And Save Your Time
In this lesson, we will discuss some of the ways to automate WhatsApp marketing and save time. Let’s get you started.
Quick Replies
Quick Replies are a feature in WhatsApp Business that offers a quick way to respond to your customer’s messages. After using this feature, you will not have to spend time responding to customers’ every day inquiry. You won’t have to greet your customer every time they send a message, either. Quick
Replies will automatically answer some of the most asked questions by your customer.
Quick Replies are your saved responses that will serve as default responses to particular questions or topics. If your customers mostly asked the same questions about your products or services, you can save a default reply to that inquiry. So whenever any customer requests for that particular question, they will receive the saved response.
Open the WhatsApp Business App on your phone.

Tap on Settings.
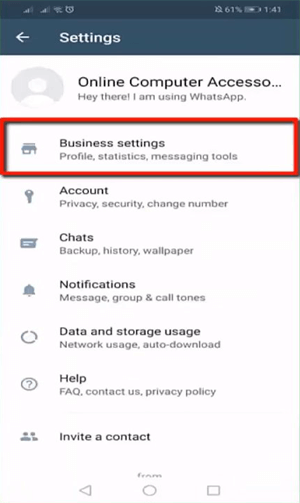
Tap on Business Settings.
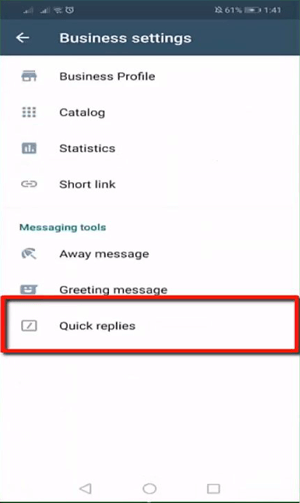
Tap on Quick Replies.
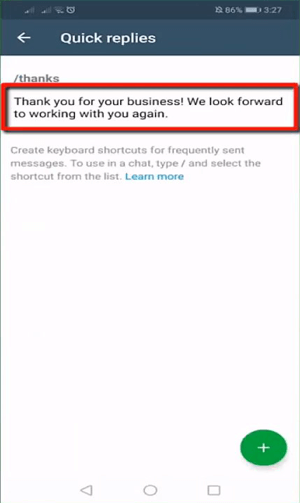
You can set up quick replies here.
Add a default message and a keyword.
Whenever the customer types the keyword in a format, followed by a keyword, the customer will receive a default reply pertaining to that keyword.
Let us add a new quick reply.

Tap on the + icon.
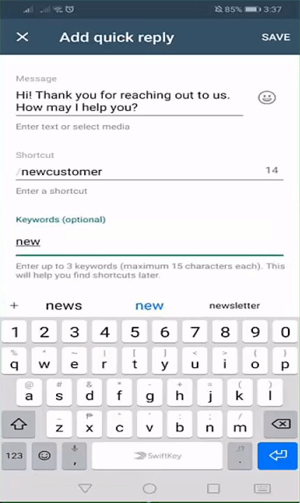
Enter a text message for a quick reply in the Message field. You can add text and media for quick replies.
Enter a shortcut starting with / followed by a word that can be used to fetch a particular reply—for example, /newcustomer.
Add three optional keywords that can have a maximum of 15 characters each. Keywords will help you find the shortcuts if you have set several quick replies for your WhatsApp Business account.
Click on Save.
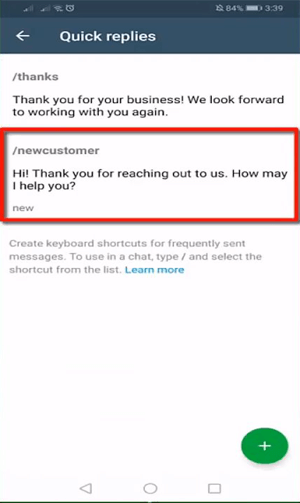
A quick reply has been set up. Tap on it to edit.
Let us learn how to send a particular reply.
Open the chat-window of your customer.
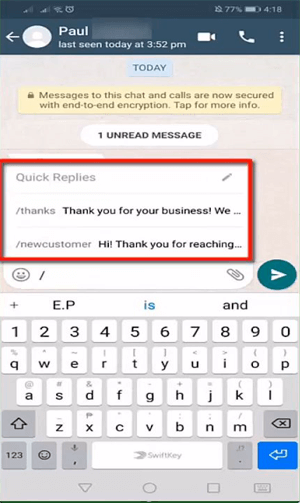
Type / to view the available quick replies that you can send to your customer.
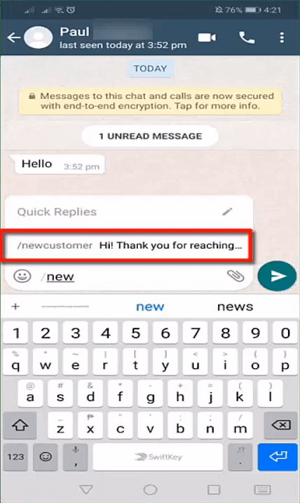
When you type the keyword for a quick reply, WhatsApp Business will display the quick reply related to that keyword.
As you tap on the quick reply being displayed, the message will be entered into the textbox.
You can add text and emojis to it, or send it right away.
Pre-defined Greetings

Greeting messages can positively affect your business. It starts the relationship with your customers, which will eventually help them in deciding whether your business is a good fit for their needs.
Customers want to be valued. Before dealing with any business, they prefer to build a good relationship first.
When a customer walks into a physical store, they feel valued when the employees welcome them. The same applies for an online business. You need to craft a warm greeting for your customer so that they do not feel out of place.
Previously we have learned how to create quick replies. Now let us learn how to set predefined greetings.
Open the WhatsApp Business App on your phone.

Tap on Settings.
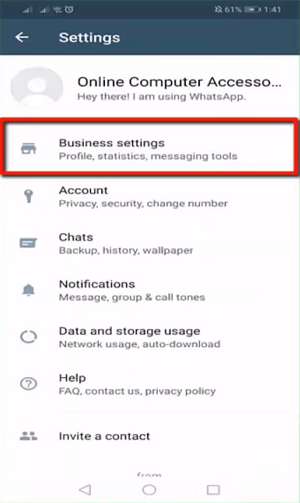
Tap on Business Settings.
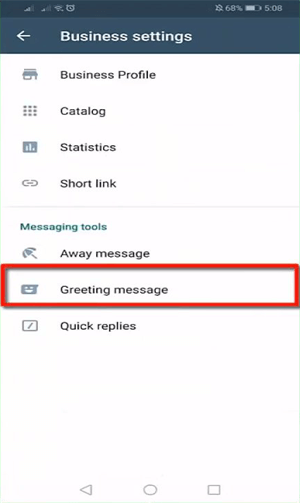
Tap on the Greeting Message.
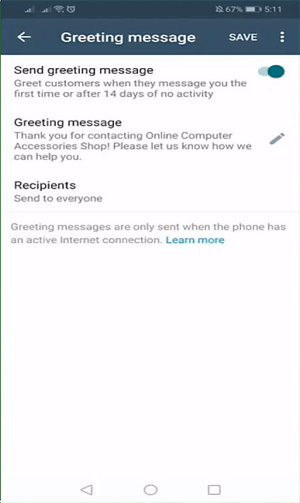
Turn the slider on to enable a greeting message.
WhatsApp already provides a default greeting message. Tap on Greeting Message to craft a new greeting message.
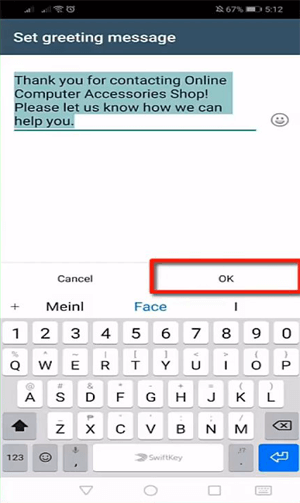
Enter a greeting message, and tap on OK.

Recipients feature allows you to manage the contacts that can receive your greetings.
Greeting messages will be sent to the customers when they message you for the first time or remain inactive for 14 days.
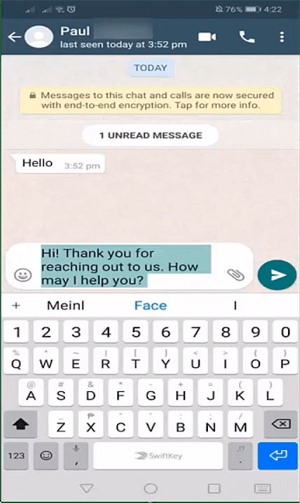
Here is an example.
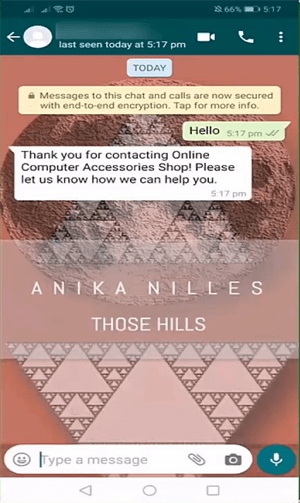
When a new customer messages you for the first time on WhatsApp Business Account, the WhatsApp Business app in your phone will automatically send a predefined message to the customer immediately, as can be seen in the image above.
Pinning Chats
Business owners receive tons of messages from their customers on WhatsApp Business App, inquiring about the products/services that they offer.
As they receive new messages every day, some of your messages can get buried down the chats. They might have to scroll down to view that chat or use the search box to find it.
To not miss out on any important message, you may want to view the chats that are more important on top.
Pinning chats is a feature in WhatsApp Business that allows you to pin messages so that all the important messages appear on top of your chat list on your WhatsApp Business App.
You can directly view the important chats instead of putting meaningless effort in having to search that chat in WhatsApp.
Let us show you how to pin chats on WhatsApp.
Open the WhatsApp Business app on your phone.
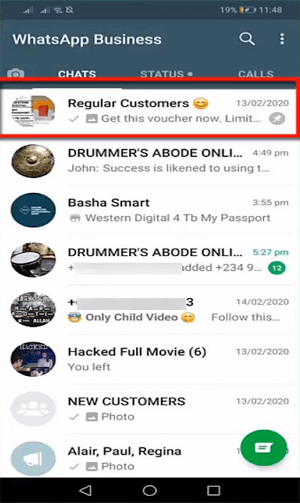
Browse the chats and long-press a conversation that you need to pin.
As you select a chat, a few icons will appear on top of the screen.

Tap on the pin icon.
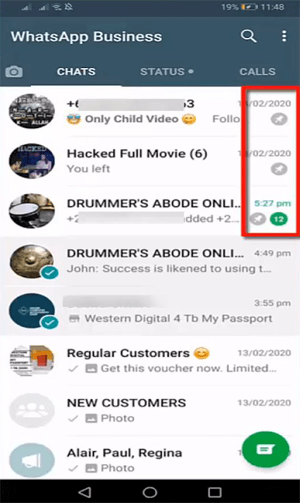
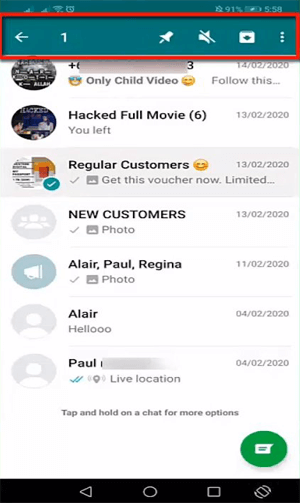
The chat has been pinned successfully on the top of the chats. The pin icon next to the chat means that the chat is pinned.
Let us now see how to unpin a chat.
A pinned chat is identified by the pin icon next to the chat.
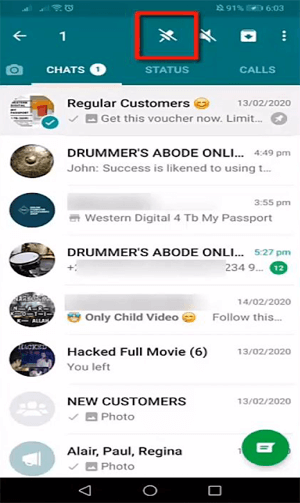
Long-press the pinned chat until you see a few icons on the top.
Tap on the unpin icon, and the chat will be unpinned automatically.
You can pin up to 3 chats on WhatsApp. To pin another chat, you will have to unpin any other chat.
Pinning chats is an easy and helpful way to prioritize important chats over the unimportant ones. You’d not have to browse through your chats to find a particular chat from one of your customers.
Labels
WhatsApp allows you to organize your chats into different categories so that you can identify each chat by its category. You can create labels for categorizing your chats. The labels can be of different colors allowing you to access any conversations by its category.
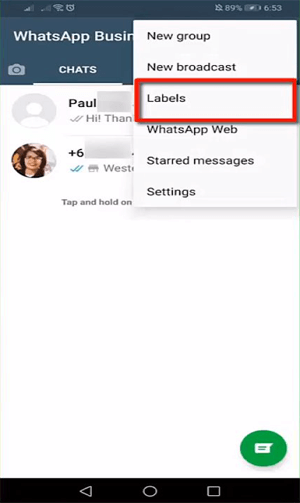
Let us learn how to label chats in WhatsApp Business app.
Open the WhatsApp Business app on your phone.
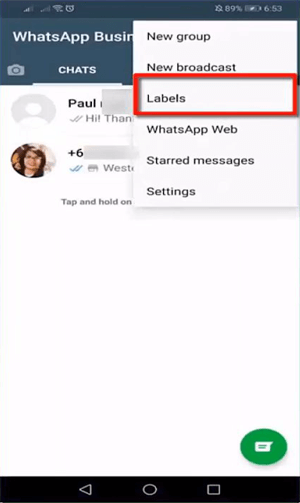
Tap on Labels.
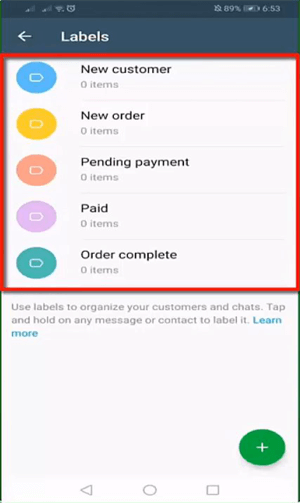
You can view the predefined labels made by WhatsApp. As you might notice, there are different colors for each label.
Tap on the + icon to add a new label.
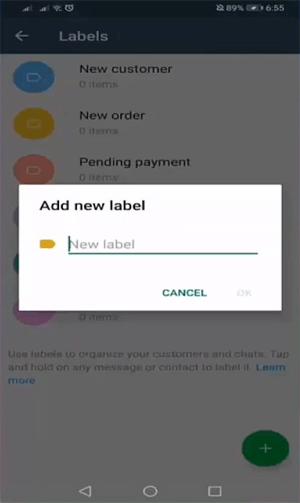
A mini-window will prompt you to add a name to the label. Whastapp will use a color for the label that has not been used already.
Let us see how to add a label to a chat.
Long-press a chat.
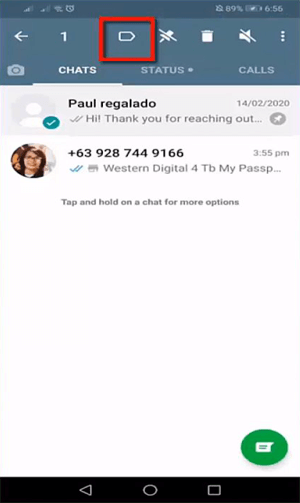
Tap on the label icon.
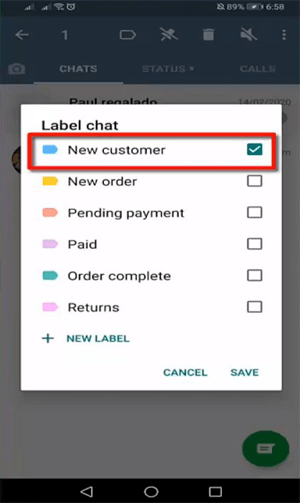
A small pop-up window will appear containing the list of existing labels to which you can add the chat. Select a label and tap on Save.
You can also add a new label by tapping on the New Label icon.
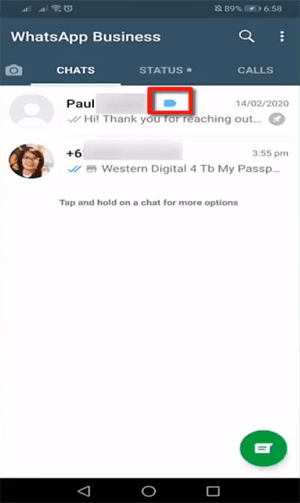
As you can see, a label has been added to the chat.
If you want to view the chats according to their labels, open Labels in WhatsApp Business app.
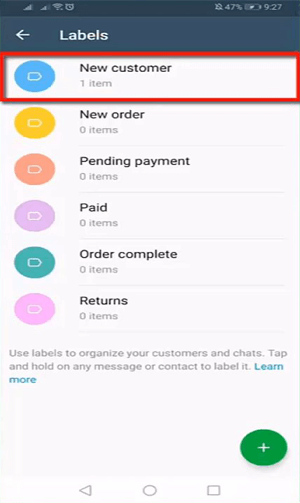
Notice that in the label New Customer, one item has been added.
Tap on the label to view chats included within the label.
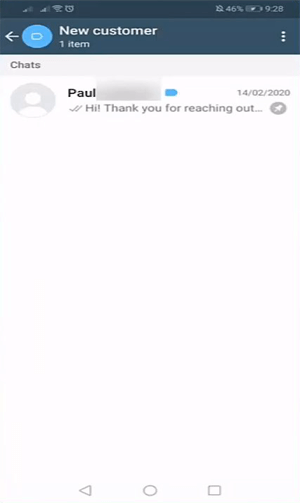
You can view all the chats categorized under the New Customer label.
Tap on the three vertical dots icon on the top to view additional options.
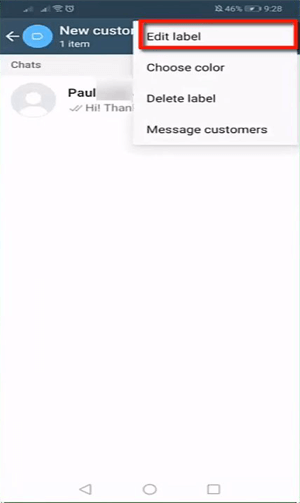
Tap on Edit Label to edit the name of the label. You can add emojis to the label name.
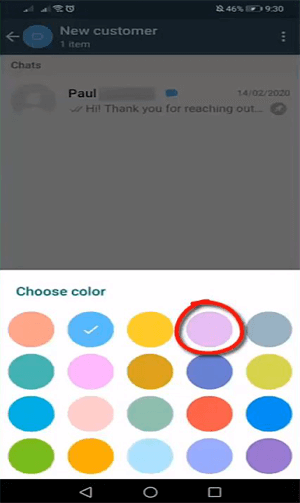
Tap on Choose Colour to change the color of the label.
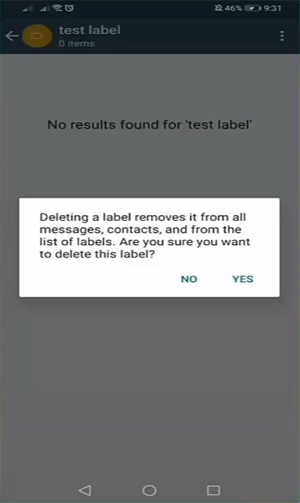
You can delete any label by tapping on Delete Label.
By deleting a label, all the chats related to this label will be left unassigned. Tap on Yes to confirm the deletion of the label.
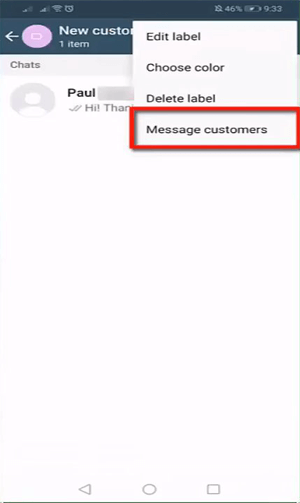
Using the label, you can send the message to the customers who are included in that label.
Tap on Message Customers.
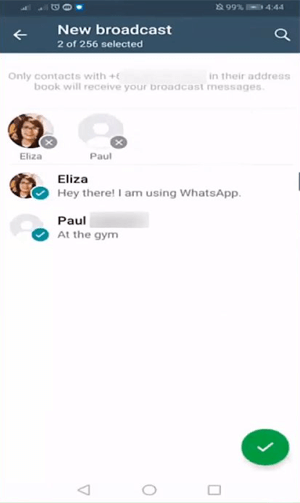
Add the customers from your contact to create a broadcast list.
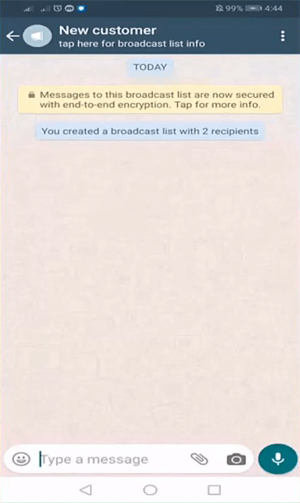
A new broadcast list has been created.
When you have tons of customers in each label, you can send broadcast messages to the contacts in that label. They will receive a message separately in their individual chat. It will save you time if you want to segment your messages to specific contacts under labels. Remember that you can only add people in your broadcast who are in your contacts.
Organizing your chats will help you to help in determining the category that the chat falls under. The WhatsApp label is a handy feature when you receive a large number of messages every day.
Away Messages
People may browse their social media accounts at any time of the day, and they might probably stumble upon your promotions at any moment. If you have included your WhatsApp Business number in your social media, you might receive messages from customers at any time of the day.
You cannot be available on WhatsApp Business 24/7, but the customers who wish to enquire about your products/services need to be attended immediately. If unattended, you may stand the risk of losing leads and potential customers.
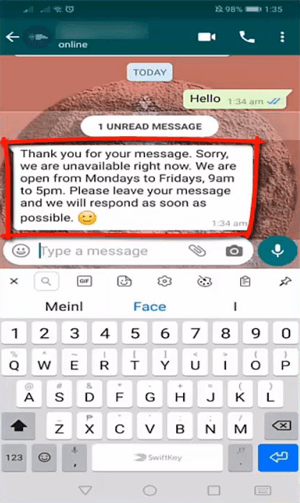
This is when the feature of Away Messages comes to the rescue. Away messages is a feature on WhatsApp that sends automated messages on your behalf whenever you receive messages from your customers after the office hours.
Away messages inform the customers that you are grateful for receiving the messages, but are not available at the time that they sent a message. Use Away Messages to let them know that you will get back to them as soon as possible.
Let us show you how to send Away messages.
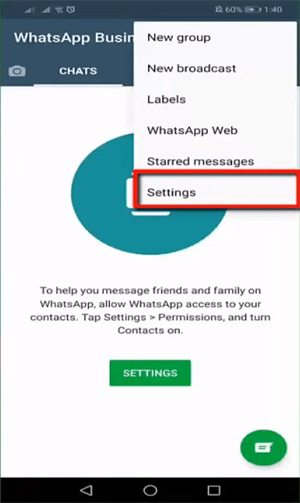
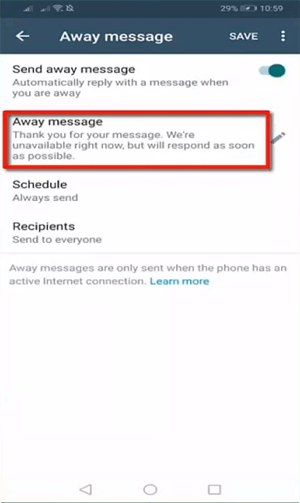
Open the WhatsApp Business App on your phone.

Tap on Settings.
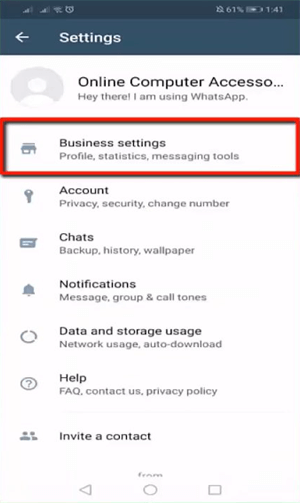
Tap on Business Settings.
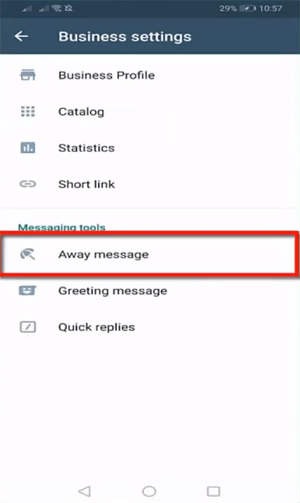
Tap on Away message.
By default, Away messages are disabled in WhatsApp Business.
Turn the slider on to enable them.
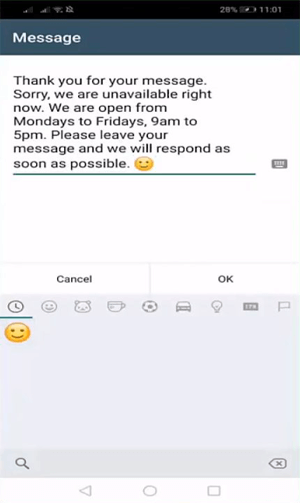
WhatsApp has a default Away Message that you can use. If you wish to change the default message, tap on the pencil icon to edit it.
Type the Away Message. You can add emoticons to the text.
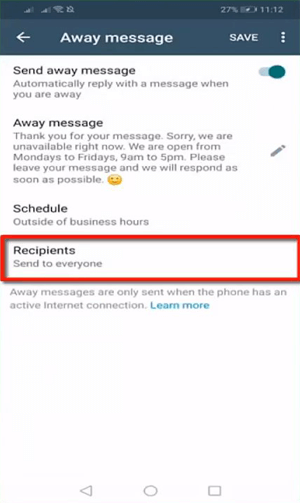
You can schedule the Away messages by tapping on the Schedule button. By scheduling messages, you let WhatsApp Business send it to your customers at a specific time.
You have the option to enable the away message to be sent always, custom schedule, or to be sent outside the business hours only.
Custom schedule allows you to set the start time and end time for sending Away Messages.

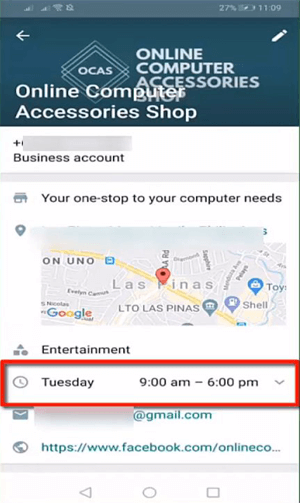
Outside of business hours feature allows you to automate away messages when the customers send the messages outside of the business hours.
You can set business hours in your WhatsApp Business profile. WhatsApp Business will automatically refer to this whenever it needs to send the Away messages.
You can set the recipients for the away message. You can set it to be sent to everyone, or only to custom people. Tap on Recipients to manage the recipients.
An example of the away message as received by the customers whenever they message outside the business hours.
Custom Notifications
When many of your contacts are connected with you on WhatsApp, and you have categorized these contacts using different labels, you can set the custom notifications for each label. On hearing the custom message tone, you can identify the type of message that you receive. This way, you can filter the chats that need your attention immediately.
Instead of having default notification for alert tones for messages and calls, you can set different notifications for the contacts on your list. This will help you identify the sender by hearing the notification sound without even looking at your phone.
Let us learn how to set custom notifications on WhatsApp Business.
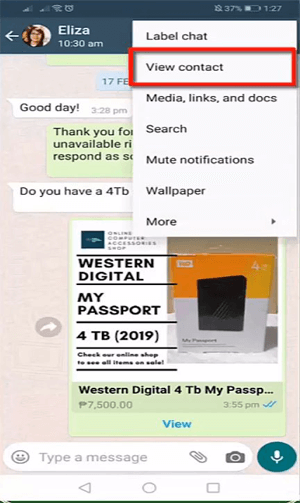
Open the chat window of the contact.
Tap on View Contact.
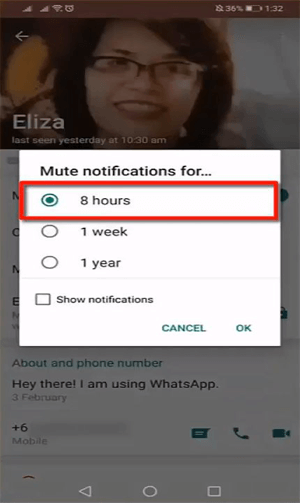
On the Settings page, you can mute the notifications from the contact. Tap on Mute Notifications.
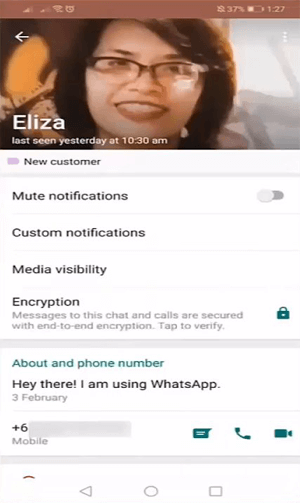
You can mute the notifications from the contact for 8 hours, a week, or a year.
Select the checkbox to enable WhatsApp to show the notifications even after muting the notifications.
You can set the media visibility, and report or block the contact if they send you inappropriate or irrelevant messages.
Tap on Custom Notifications.
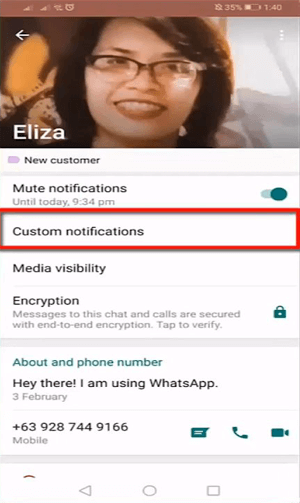
You need to enable custom notifications to be able to set different notifications for the contacts.
If this option is disabled, all the contacts will have default notifications.
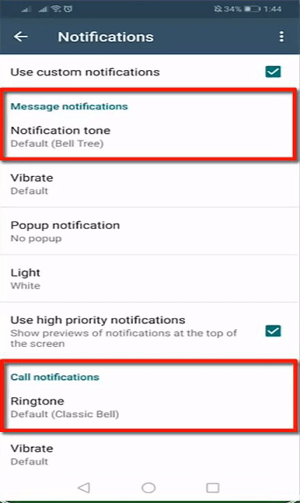
You can now change the notifications for messages and calls.
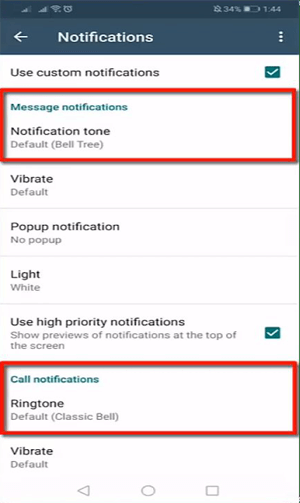
Tap on Notification Tone.
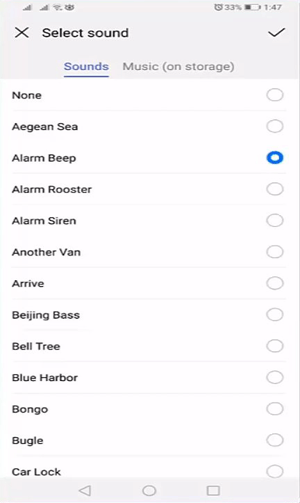
Tap on Select Sound to choose a sound from your phone.
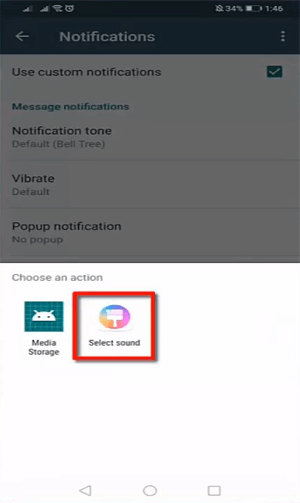
As you tap on each sound, you can hear a preview.
Choose the right sound, and tap on the check icon.
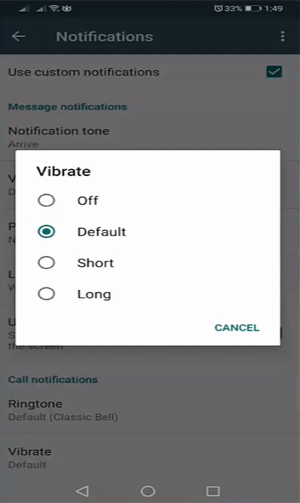
Tap on Vibrate to enable/disable the vibration. You can set the vibration as long, short, off, or default.
Turn off the vibration if you are running on a low battery.
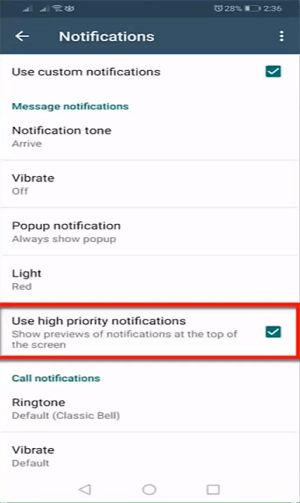
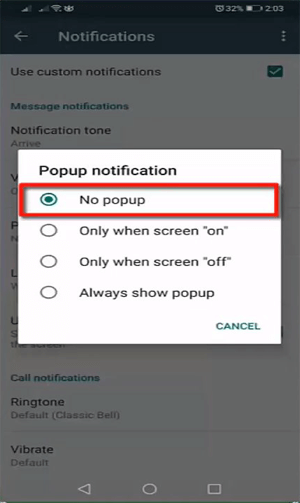
You can set the pop-up notification to be viewed under certain conditions, as shown in the image.
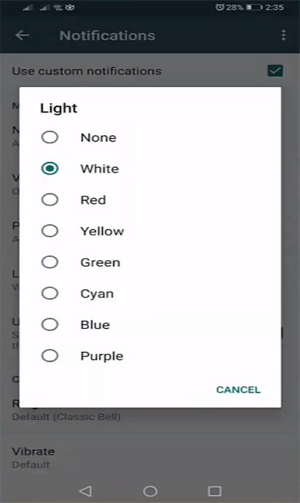
When you tap on the Light, you can choose a different color as the notification light.
This feature allows you to have a preview of the notifications on the top of your phone’s screen.
Similar to the message notifications, you can set a ringtone and vibrate option for calls.
This is how easily you can set custom notifications in your WhatsApp contact list. Setting custom notifications help you identify the senders and prioritize them.
That’s it, folks!!! In this lesson, we have learned how to automate WhatsApp marketing and save time. Hope you found the lesson helpful. In the next lesson, we will discuss how to get more leads on WhatsApp. Stay tuned!!!